This guide documents how I was able to extend (bridge) my office network to my home using two dd-wrt routers and the built-in OpenVPN server/client. The end result is effectively a remote network that's connected to my office network in every way, each LAN port on the remote dd-wrt router and even the wi-fi connects to the office network. The remote clients are able to acquire their IP from the office DHCP server, can browse the web through the office Internet connection, can see and connect to all Samba and Windows shares, can acquire network licenses from license servers, can browse the office's Intranet, etc. The only difference between connecting directly to the office network vs. remotely is the network speed due to the ISP's limited bandwidth.
The diagram above (click for a larger image) shows graphically what the tap bridge is doing, on the right is the “Work LAN” with subnet 192.168.1.0/24, by using a bridge between the two dd-wrt routers the “Work LAN” extends to the left where any computer plugged into the network port or connected wirelessly is effectively connected to the “Work LAN” on the right.
While in the end the setup for the two dd-wrt routers is simple enough, the reason I made this guide is because I had trouble finding helpful information when I was setting it up for the first time. It seemed most of the information was dated and more complicated than it otherwise needed to be. Below I will show you the settings I used that got things working for me, but here are a few links that helped me along the way (keep in mind they're dated):
Before I get into the step-by-step configuration I should mention that I'm assuming dd-wrt is already flashed onto the two routers that you intend to use. If you haven't yet done this please refer to the dd-wrt website for how to flash your router. Also I should mention the version of dd-wrt that I'm using is v24-sp2 (04/09/11) mega running on a LinkSys E3000 router. At the time of writing this is the latest version available, but in due time even this blog entry will date. Without further ado, let's get started ...- The first step is to generate a Public Key Infrastructure (PKI), the details of which are beyond the scope of this guide; instead please refer to OpenVPN's instructions here. Essentially what you're doing is creating certificates and keys that the OpenVPN server uses to validate clients that connect - nothing more, nothing less. As you'll see there are four steps, and with each step certificates and keys are created:
- Master Certificate Authority
- Server Certificate & Key
- Client Certificates & Keys (one each per client)
- Diffie Hellman Parameters
- ca.crt
- server.crt
- server.key
- dh1024.pem
- client.crt
- client.key
One thing I should mention! When I first generated the keys I kept getting a "certificate not yet valid error":
VERIFY ERROR: depth=1, error=certificate is not yet valid:
In my case the reason for this was because the certificate was signed using GMT time, not local time. The resulting certificate wasn't valid until the local time equalled that of GMT at the time of signing. For example, I'm in Vancouver where our local time is GMT-8, therefore the certificates I create will not be valid until 8 hours later, assuming that the router is using an NTP time server and the time zone is set to GMT-8. To get around this I simply set the computer's date back by one day before signing the certificates, alternatively I could have waited 8 hours but I'm impatient.
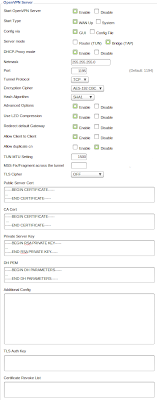
Server Settings, click the image below to see my server settings (note: for no particular reason I didn't use the default port, feel free to do the same or use the default 1194). For each of the certificate and key text fields, copy and paste the information from the following files:
Public Server Cert server.crt CA Cert ca.crt Private Server Key server.key DH PEM dh1024.pem Client Settings, click the image below to see my client settings. Replace serverip.com with the IP address or domain name of your dd-wrt router running OpenVPN server. For each of the certificate and key text fields, copy and paste the information from the following files:
CA Cert ca.crt Public Client Cert client.crt Public Client Key client.key Click "Apply Settings" then check both the server and the client OpenVPN connection status under "Status -> OpenVPN". If all went as planned the status window on the server will show the client connected.
One final note, be sure the DHCP server on the OpenVPN client router is OFF and any computers or other devices that you connect to the OpenVPN client router are set to use the office network's DHCP server, unless you already have a static IP that doesn't conflict with the office network. To manage the OpenVPN client router again, be sure to remember the subnet the router is set to and the router's IP address, in this case you'll need to set a static IP on your computer and connect to the router.
Well I hope seeing the settings I used helps someone, I couldn't find the same when I was setting up my connection. But as you can see it's actually fairly simple, it's just a matter of configuring the OpenVPN server and client correctly.
If you have any questions or comments please feel free to contact me through the blog.
If you found this guide useful, please consider donating to the dd-wrt project. It's their hard work that makes this possible.
Other worthy causes:
In the process of creating this blog entry I used the following open source software.


